Higher class carries lower
A business cabin will take economy passengers, and a first class cabin will take both. It never works the other way — an economy cabin cannot hold a business contract no matter how many seats are free.
 Initializing NVIR systems
Guides // Activities
Fit cabins instead of cargo racks and fly people where they want to go — transport runs, VIP contracts, and sightseeing tours.
Passenger work is hauling with the market taken out of it. You fit cabins instead of cargo racks, take a contract at a fixed price, and get paid on arrival — no buy price, no demand to check, nothing to lose if the run goes wrong beyond your time and your reputation. It is the safest way to move large numbers of credits, and the one career where the ship you fly matters less than the station you fly out of.
There are two halves to it, and they reward completely different flying. Transport moves a group or a named individual from one station to another — short hops, stacked in bulk, paid on trade rank. Sightseeing takes tourists to beacons scattered across a few hundred light-years and brings them back to where they started. Sightseeing is slower per mission and pays much better per seat, and the long-range version of it is exploration with a payslip attached.
The money is not in any single contract. It is in stacking (Stacking Missions: Taking several contracts with the same objective from different factions, so one run pays all of them.) — filling every cabin from one board before you leave — and in reputation, which decides how good that board is in the first place. A commander who has never left Robigo out-earns one who wanders between stations taking whatever is offered.
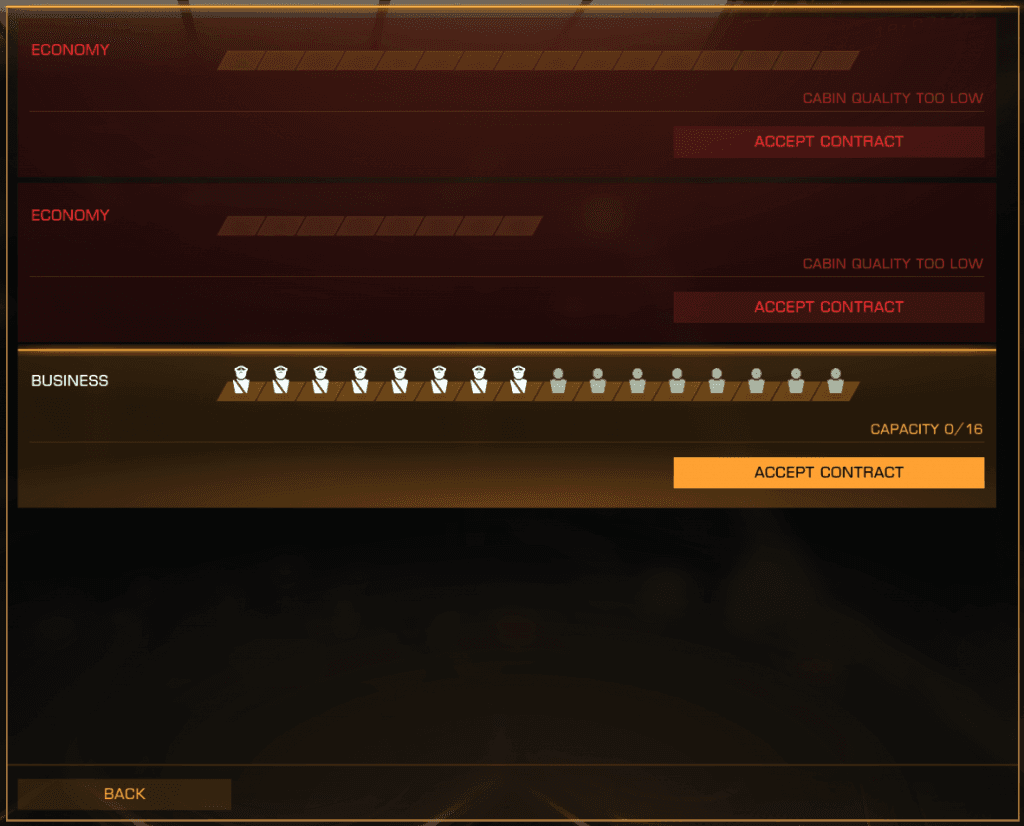
Four cabin classes exist, and each contract names the minimum class it will accept. Fitting the wrong spread is the single most common reason a good board shows nothing you can take.
| Slot size | Mass | Economy | Business | First | Luxury |
|---|---|---|---|---|---|
| Class 2 | 2.5 t | 2 seats | — | — | — |
| Class 3 | 5 t | 4 seats | 3 seats | — | — |
| Class 4 | 10 t | 8 seats | 6 seats | 3 seats | — |
| Class 5 | 20 t | 16 seats | 10 seats | 6 seats | 4 seats |
| Class 6 | 40 t | 32 seats | 16 seats | 12 seats | 8 seats |
Read that table twice, because two things fall out of it. Every cabin in a given slot weighs the same regardless of class, so comfort costs credits and never jump range. And seats collapse as class rises — the same Class 6 slot is 32 economy bunks or 8 luxury suites.
A business cabin will take economy passengers, and a first class cabin will take both. It never works the other way — an economy cabin cannot hold a business contract no matter how many seats are free.
Ordinary passengers of the same class pool into whatever cabins are free, so one large cabin can serve several contracts at once. A VIP takes an entire cabin to themselves regardless of how many seats it has — a Class 6 luxury suite carries exactly one VIP.
Because VIPs claim whole cabins, four Class 4 cabins take four VIP contracts while one Class 6 takes one. Split the slots unless you are deliberately running bulk economy loads.
Only the Dolphin, Orca, and Beluga Liner can mount luxury cabins. Every other hull tops out at first class, which is why those three ships exist.
Five to ten tonnes. Passengers ask for specific commodities in flight, and some contracts pay part of the reward in materials or goods you need somewhere to put.
A passenger ship carries nothing that shoots. Weapons are mass you will never use — you are not going to win a fight with a hull full of tourists, and every tonne is a fraction of a jump.
The core of the build. Aim for a range of classes rather than one — economy for bulk groups, business and first for the contracts that actually pay. Only fit luxury if you are flying a Saud Kruger hull and basing out of a tourist system.
Range decides how many contracts on the board are reachable in a sensible time. SCO (Supercruise Overcharge: A Frame Shift Drive that can dump extra acceleration into supercruise. Fast, thirsty, and hot.) supported an engineered FSD (Frame Shift Drive: The drive that does both jobs: hyperspace jumps between systems, and supercruise inside them.), or a pre-engineered unit from a human tech broker, is the single biggest upgrade to credits per hour on this career.
Mandatory for tours and long-range work, useful everywhere else. Sightseeing beacons sit hundreds of light-years out, and there is no station on the way.
Not for surviving a fight — for surviving the twenty seconds before you escape one, and for the landings. Hull damage makes passengers unhappy, and unhappy passengers cost you the contract.
Two if you have the slots. Silent running is how you refuse a scan with a wanted passenger aboard, and silent running without heat sinks (Heat Sink Launcher: Dumps the ship’s heat into an ejected sink. Also the way to survive silent running.) cooks the ship.
Long-range tours only. A thousand light-years out there is no station to repair at, and an AFMU (Auto Field-Maintenance Unit: Repairs modules in the field from its own ammunition pool. Cannot repair the hull or itself.) keeps the drive, the scoop, and life support running on the way home.
The hulls worth flying, in the order most commanders reach them.
| Ship | Class | Price | Description | Build |
|---|---|---|---|---|
| Dolphin | Small | 1.1M CR | The ideal entry-level passenger ship. Small, efficient, and exceptionally cool-running, making it perfect for learning passenger missions and sightseeing. | — |
| Lynx Highliner | Medium | 69.3M CR | A high-capacity passenger transport that brings large-ship capacity to a medium pad. Tougher and more versatile than traditional liners, making it ideal for moving large numbers of passengers. | — |
| Orca | Large | 47.8M CR | A fast luxury liner built for VIPs and sightseeing. Its speed, range, and access to Luxury cabins make it the go-to choice for dedicated luxury passenger work. | — |
Passenger contracts are not on the mission board. They live in the Passenger Lounge, a separate contact in station services, and not every station has one. Docking somewhere with no lounge and wondering where the missions went is the standard first mistake.
Tourist economies exist to generate sightseeing contracts, and high-population systems generate the volume you need to stack. Inara filters stations by economy and services — use it to find lounges near you rather than docking hopefully.
Board quality is tied to your standing with the local factions, and standing only grows where you keep working. Two hours at one station beats two hours spread across six.
The classic loop, and still the fastest ramp there is. Take sightseeing contracts at Robigo Mines out to the Sirius Atmospherics beacon in Sothis and come straight back — roughly a quarter of an hour a round trip once you know the route, and it scales hard with reputation.
Systems in trouble throw evacuation contracts — large economy loads, short hops, and a queue of them at once. The pay is decent and the risk is that you are flying into whatever caused the emergency.
Every contract you see is filtered by your standing with the faction offering it. At neutral you are shown small groups and modest sums; at allied the same lounge hands out contracts worth many times that. Nothing about your ship changes this.
Most contracts offer a choice of payout. Early on, take reputation over credits every time — it compounds into better contracts within an hour or two, and the credits you gave up are recovered on the first upgraded board.
VIP contracts move your reputation with the faction that issued them; bulk transport mostly moves that faction’s influence in the system. Reputation is what unlocks the board, so fly the VIPs when the board is what you are trying to improve.
Handing cartographic data to a station credits the controlling faction. A single decent survey sold at your home base moves standing faster than several small contracts.
Donation missions on the ordinary mission board convert credits straight into standing. Worth it when you have money and no reputation, which is the usual state after switching bases.
Contracts regenerate on a timer. Rather than sit and wait, undock and take a short flight, or switch between Open (The shared galaxy where other commanders can find you — and shoot you. Solo and private groups do not.), Solo, and a private group — each pulls a different pool of contracts.
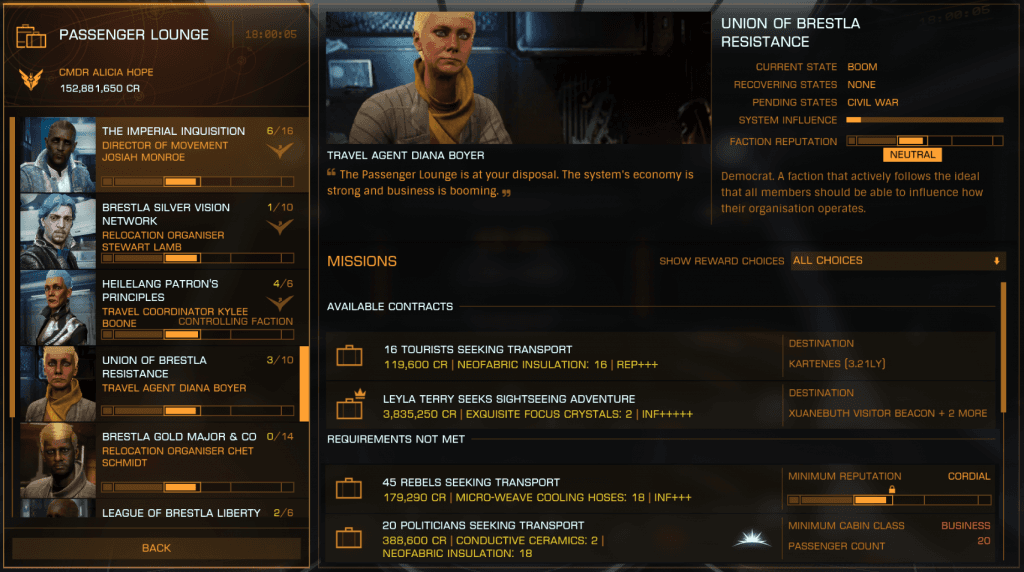
The lounge lists factions on the left and their offers on the right — passenger count or VIP name, destination, distance, and the reward options. Anything you cannot take drops into a Requirements Not Met section that tells you exactly why: not enough seats, cabin class too low, standing too low, a large ship for an outpost destination.
| Contract | What it asks | Where it pays off |
|---|---|---|
| Group transport | Move a batch of typed passengers — workers, politicians, soldiers — from this station to another. | Stacking. Take every offer heading to the same system, fly once, hand in the lot. |
| VIP transport | One named passenger, one whole cabin, usually a short hop with demands attached. | Cabin count. Several small cabins turn one trip into five contracts. |
| Sightseeing tour | Visit one or more tourist beacons within a few hundred light-years, then return to the station you started from. | Per-seat value. The best credits-per-minute in the career once the route is known. |
| Long-range expedition | A beacon or destination 1,000 to 30,000 ly out, and back. | Only alongside exploration. Scan as you go or the hourly rate is poor. |
| Evacuation | Bulk economy loads out of a system in crisis, usually short-range and urgent. | Volume. A Lynx Highliner or Beluga clears a queue of these in one trip. |
The two biggest levers. A first class contract pays multiples of the economy contract sitting next to it for the same trip.
Light-years to the destination system, and light-seconds from its star to the station. A station 200,000 Ls (Light-Second: Distance inside a system. A station 200,000 Ls out is a long supercruise, jump range be damned.) out doubles the trip length for the same jump range.
Shorter completion windows pay more. They are also how commanders fail contracts, so read the clock against the number of beacons before accepting.
The red trait on the contract. Substantially more credits, and a security scan at either end turns the station hostile.
Higher recommended rank means a higher reward. This is the part that grows on its own if you stay in one place.
Fill the largest and highest-class cabins before the small ones. Accepting a small group into a large cabin wastes the seats you needed for the contract that pays.
Four contracts to one station beat six contracts to five stations. For transport work the trip is the cost; the passengers are almost free.
Sightseeing contracts each carry their own beacon list, so stacked tours mean more stops rather than a shared route. Count the total beacons against the tightest timer on board, and budget eight to ten minutes for each one with the jumps included.
Ordinary passengers of the same class share cabins; VIPs never do. A board of six VIPs needs six cabins no matter how empty the ship looks.
Transport is the simple half: plot, jump, dock, hand in. Sightseeing is the half worth learning, because the beacon step is where new commanders sit in supercruise wondering why nothing has happened.
Open the Transactions tab in the left panel. Each tour lists its beacons in order, along with which ones you have already visited.
Set the furthest beacon system in the Galaxy Map and check the jump count. If the route is longer than the timer allows, drop the contract at the lounge rather than launch and find out.
On arrival, the beacon appears in the navigation tab as a destination in that system, often several hundred thousand light-seconds out. Lock it and supercruise there.
Slow down as you close and hold near the beacon until the message plays and the transaction panel ticks the destination off. Blowing past at speed does nothing.
Beacons attract sightseeing traffic and sit in tight spaces. Clipping the beacon, a cruise liner, or a rock damages the hull and your passengers notice.
Tours pay out where they started. A tour is only half done when the last beacon ticks over.
VIP contracts carry a satisfaction level, visible in the Transactions tab alongside the contract. Let it fall far enough and the passenger walks — either ejecting mid-flight or abandoning the ship on the next landing — and the contract fails with them. Bulk passengers are far steadier: they rarely make demands and almost never walk, which is what makes stacked economy runs the low-stress half of the career.
Every VIP contract lists its passenger’s traits before you accept. They are the honest description of what the trip will cost you.
| Trait | What it means in flight |
|---|---|
| Rich Tourist | Sensitive to hull damage, and likely to ask for something on the way. |
| Celebrity | All of it at once — damage, the clock, scans, requests, and hired ships that come looking for you. |
| Famous Explorer | Damage and scans only. The easiest of the demanding traits to fly clean. |
| Criminal Mind | Wanted somewhere on the route. Avoiding a security scan is the whole contract. |
| CEO | Damage, the clock, and requests, with attackers in the mix. |
| What drops satisfaction | What to do about it |
|---|---|
| Hull damage | Fly a shielded ship and dock cleanly. This is the most common cause and the easiest to avoid. |
| Being scanned | Especially with a wanted passenger aboard. See the next section. |
| Taking too long | Route before you launch. Detours to sell data or run an errand cost more than they earn on a VIP clock. |
| Refusing a request | Declining outright drops it immediately. Accepting and then not delivering drops it too. |
The requests themselves are the part people overthink. Passengers ask for a commodity, or a detour to somewhere they have decided they want to see. Refusing does not fail the contract — it only costs satisfaction, and a short trip finishes long before that matters.
On a two-jump transport, a demand made in the first minute is irrelevant. Fly, dock, get paid.
On a contract measured in hours, satisfaction has room to slide. Carry a few tonnes of cargo space so a commodity request is a market stop rather than a refusal.
A request that adds a thousand light-years is not worth a satisfaction tick. Decline it, fly the route, and accept the smaller hit.
Wanted passengers are where passenger work stops being the safe career. The contract flags them in red before you accept, the payout is worth taking, and the entire trip becomes an exercise in not being scanned.
Security ships in the station slot and around Nav Beacons, and any authority vessel that interdicts you. A ship scan reads the passenger manifest; a cargo scan does not.
Silent running closes the heat vents and hides the ship, breaking the scan. It also heats you fast — dump a heat sink (Heat Sink Launcher: Dumps the ship’s heat into an ejected sink. Also the way to survive silent running.), hold it for the few seconds you need, and drop it again.
Landing ends the scan attempt. Request docking early, come in with the pad already assigned, and do not loiter in the slot admiring the station.
Fighting the interdiction (Being pulled out of supercruise by another ship. Escape by keeping the marker centred, or submit.) usually loses and drops you with a long drive cooldown. Throttle to zero, submit, four pips to engines, boost, and high-wake (Leaving by hyperspace jump to another system. Nothing can follow you through it.) out.
Jumping to another system cannot be followed. Dropping back to supercruise can, and the same ship will pull you again thirty seconds later.
Dock at the destination, open the Passenger Lounge or the transaction panel, and hand the contract in. Transport pays where the passengers get off; tours pay back at the station that issued them. There is no market to time and no cargo to sell — the number you were shown on acceptance is the number you get.
Stacked contracts complete individually. Work down the transaction list before undocking so nothing rides along to the next system by accident.
The lounge you just paid out at is also the lounge whose standing you just raised. Refill the cabins before you leave the pad — the return leg of a tour is the empty half of the loop.
Credits when you are saving for a hull, reputation while you are still building a base, materials when a contract offers something an engineer wants.
If you honked (Discovery Scanner Honk: Holding the Discovery Scanner on arrival. Reveals how many bodies a system holds and where they sit.) systems with your DS (Discovery Scanner: Fitted to every hull and cannot be removed. One honk on arrival counts the bodies in a system and draws their orbits — the FSS identifies them, the DSS maps them.), you can sell the data for additional credits.